This post goes out to the habitual offenders, the ones who know but don’t do it, the ones who know AND do it but waste time with Photoshop or something similar, and for those who do it and do it right but want others to do the same and don’t want to spend the time teaching or writing out the instructions. Print it out and hand it out.
These days, with ultra-compact digital cameras coming in around $200 and megapixel counts in the 7’s, 8’s, and 9’s, everyone is taking digital pictures and they’re all HUMONGOUS. Between on-line forums, emails from family members, and massive Powerpoint presentations, I’m drowning in over-sized photos and surrounded by people who, understandably, don’t want to waste their time resizing each and every picture they want to share. At some point, for some reason, these photos have to get smaller and, unfortunately, not everyone knows how to do that. And I’m Josh and I can help (at least the website says so) so I’m going to show you a free program that makes the whole resizing thing easier than you thought possible. If you’re using Photoshop and resizing each image, you’re wasting your time. And if you’re NOT resizing your pictures, you’re wasting everyone else’s.
Why should digital pictures be resized?
The problem with big pictures is their size. Har har har… no really, the size contributes two annoyances:
- Big pictures are “physically” very large and can’t fit on the screen unless a particular program resizes them. The size can also stretch out web sites and make everything a complete mess
- Big pictures are virtually large as well and, as such, are comprised of a lot of data. This can fill up email programs, slow down computers, and take forever to download.
With my Canon SD1000 (a small, great, inexpensive ultra-compact digi-cam) set to its highest resolution (meaning the size of the image), it’s taking pictures at 3072 x 2304 pixels. This is 7,077,888 pixels (or dots) of color that has to be stored and transferred. Unless you’re printing these photos on 8×10 paper, a picture of this size will do you no good. You’re also going to need several different emails if you want to send a whole group of them to someone, not to mention the hard drive space it takes to store them (on both machines).
Clearly, it has to be done but how to go about it?
How can digital pictures be resized?
In order to get your pictures in a more manageable size to use, share, and post online, you will need to reduce the amount of data that is contained in the picture file. This can be done by reducing the actual size of the photo while keeping the overall quality. This can be done with an image editing software like Photoshop but there’s no need to break out the big guns for such a minor task.
I just recently starting using the aptly-named software PIXresizer and I couldn’t be happier with how it works. I’ll walk you through some of the basic functions of this free software so you can pass them along to the technology-handicapped people in your life… or just send the link to a friend.
First, download it here (scroll down and look for the “DOWNLOAD [ 3.3 Mb .zip]” link). Open the .ZIP file and run the program Setup to install it on your machine. Make sure to add an icon to your desktop and run the program.
How do I use this PIXresizer program?
PIXresizer is very easy to use so I’ll keep these instructions nice and short. For those who are fluent in image language (sizes in pixels, images types, etc), this list of instructions will probably be useless to you. It’s very easy to poke around and figure out what to do. If you’re not so computer-savvy, I’ll show you how to get the most out of this great little freeware program.
This program runs in two modes: single picture and batch processing. We’ll take these one at a time…
Single photo resizing
When you first open the program, it will default to the “Work on one file” option. This is what you want to use when you just want to re-size one file (see, I told you this thing was easy). Step one is to pick a file to work on by clicking the Load Picture button.
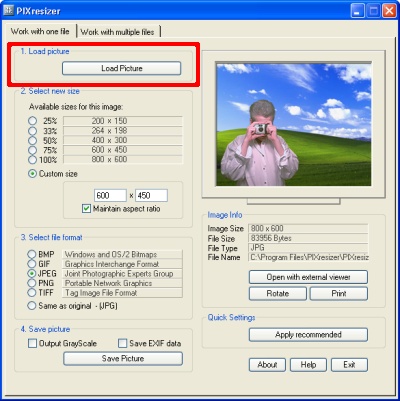
As you might expect, this will open a file explorer window where you can pick the photo you want to alter. Conveniently enough, the window starts in your My Pictures folder. Choose an over-sized photo you want to change and click Open. Your photo will now be loaded in the little window on the right instead of that ridiculous image of the guy in the pink shirt taking your photo in front of the XP background (why).
Step 2 (marked as such in PIXresizer) is to choose a new size for your photo.
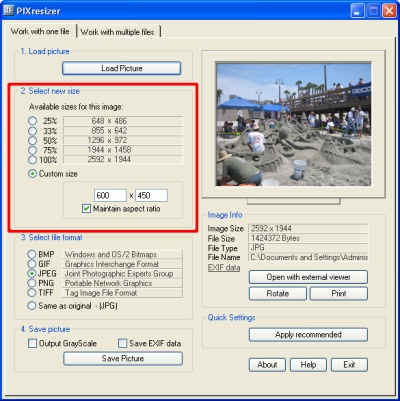
PIXresizer gives you a few quick options to make your life easier.
- 25% gets us to 648 x 486 pixels. This is not a “standard” size but it’s great for uploading to the web (Flickr, Facebook,etc). If you are sending over email, photos don’t need to be this small.
- If you’re sending over email, a perfect size is about 800 x 600 (the 33% option gets you close to this). Pictures of this size are not too big, easy to see on any monitor, and retain a good amount of the detail that was in the picture originally.
- If you want to just save some space on your computer and you’re not going to be printing these in a large format, you’re safe with storing them at around 1200×900. This size is small enough not to be unwieldy but still big enough to retain most of the detail of the original.
- The custom size can be used for any of the options I gave above or to make the photo a specific size (if requested by a person, program, or website).
To get an idea of what these sizes actually mean for you check out the examples below:
This will give you a good idea of what it will look like on other screens. Keep in mind that some web browsers will resize your photo automatically. To see them in their native size, right-click on the displayed image and select either Save Image As… or Save Picture As… and pick a place on your computer. Now open the picture on your hard drive to get a better idea of what it will look like for others.
The other size option that is given is labeled Maintain Aspect Ratio. Every image has a particular ratio – the length divided by the width (or vice versa). As you make images smaller or larger, you usually want to keep this ratio the same so the image does not distort. Unchecking this box will allow you to put in two separate measurements for length and width, allowing the image to skew.
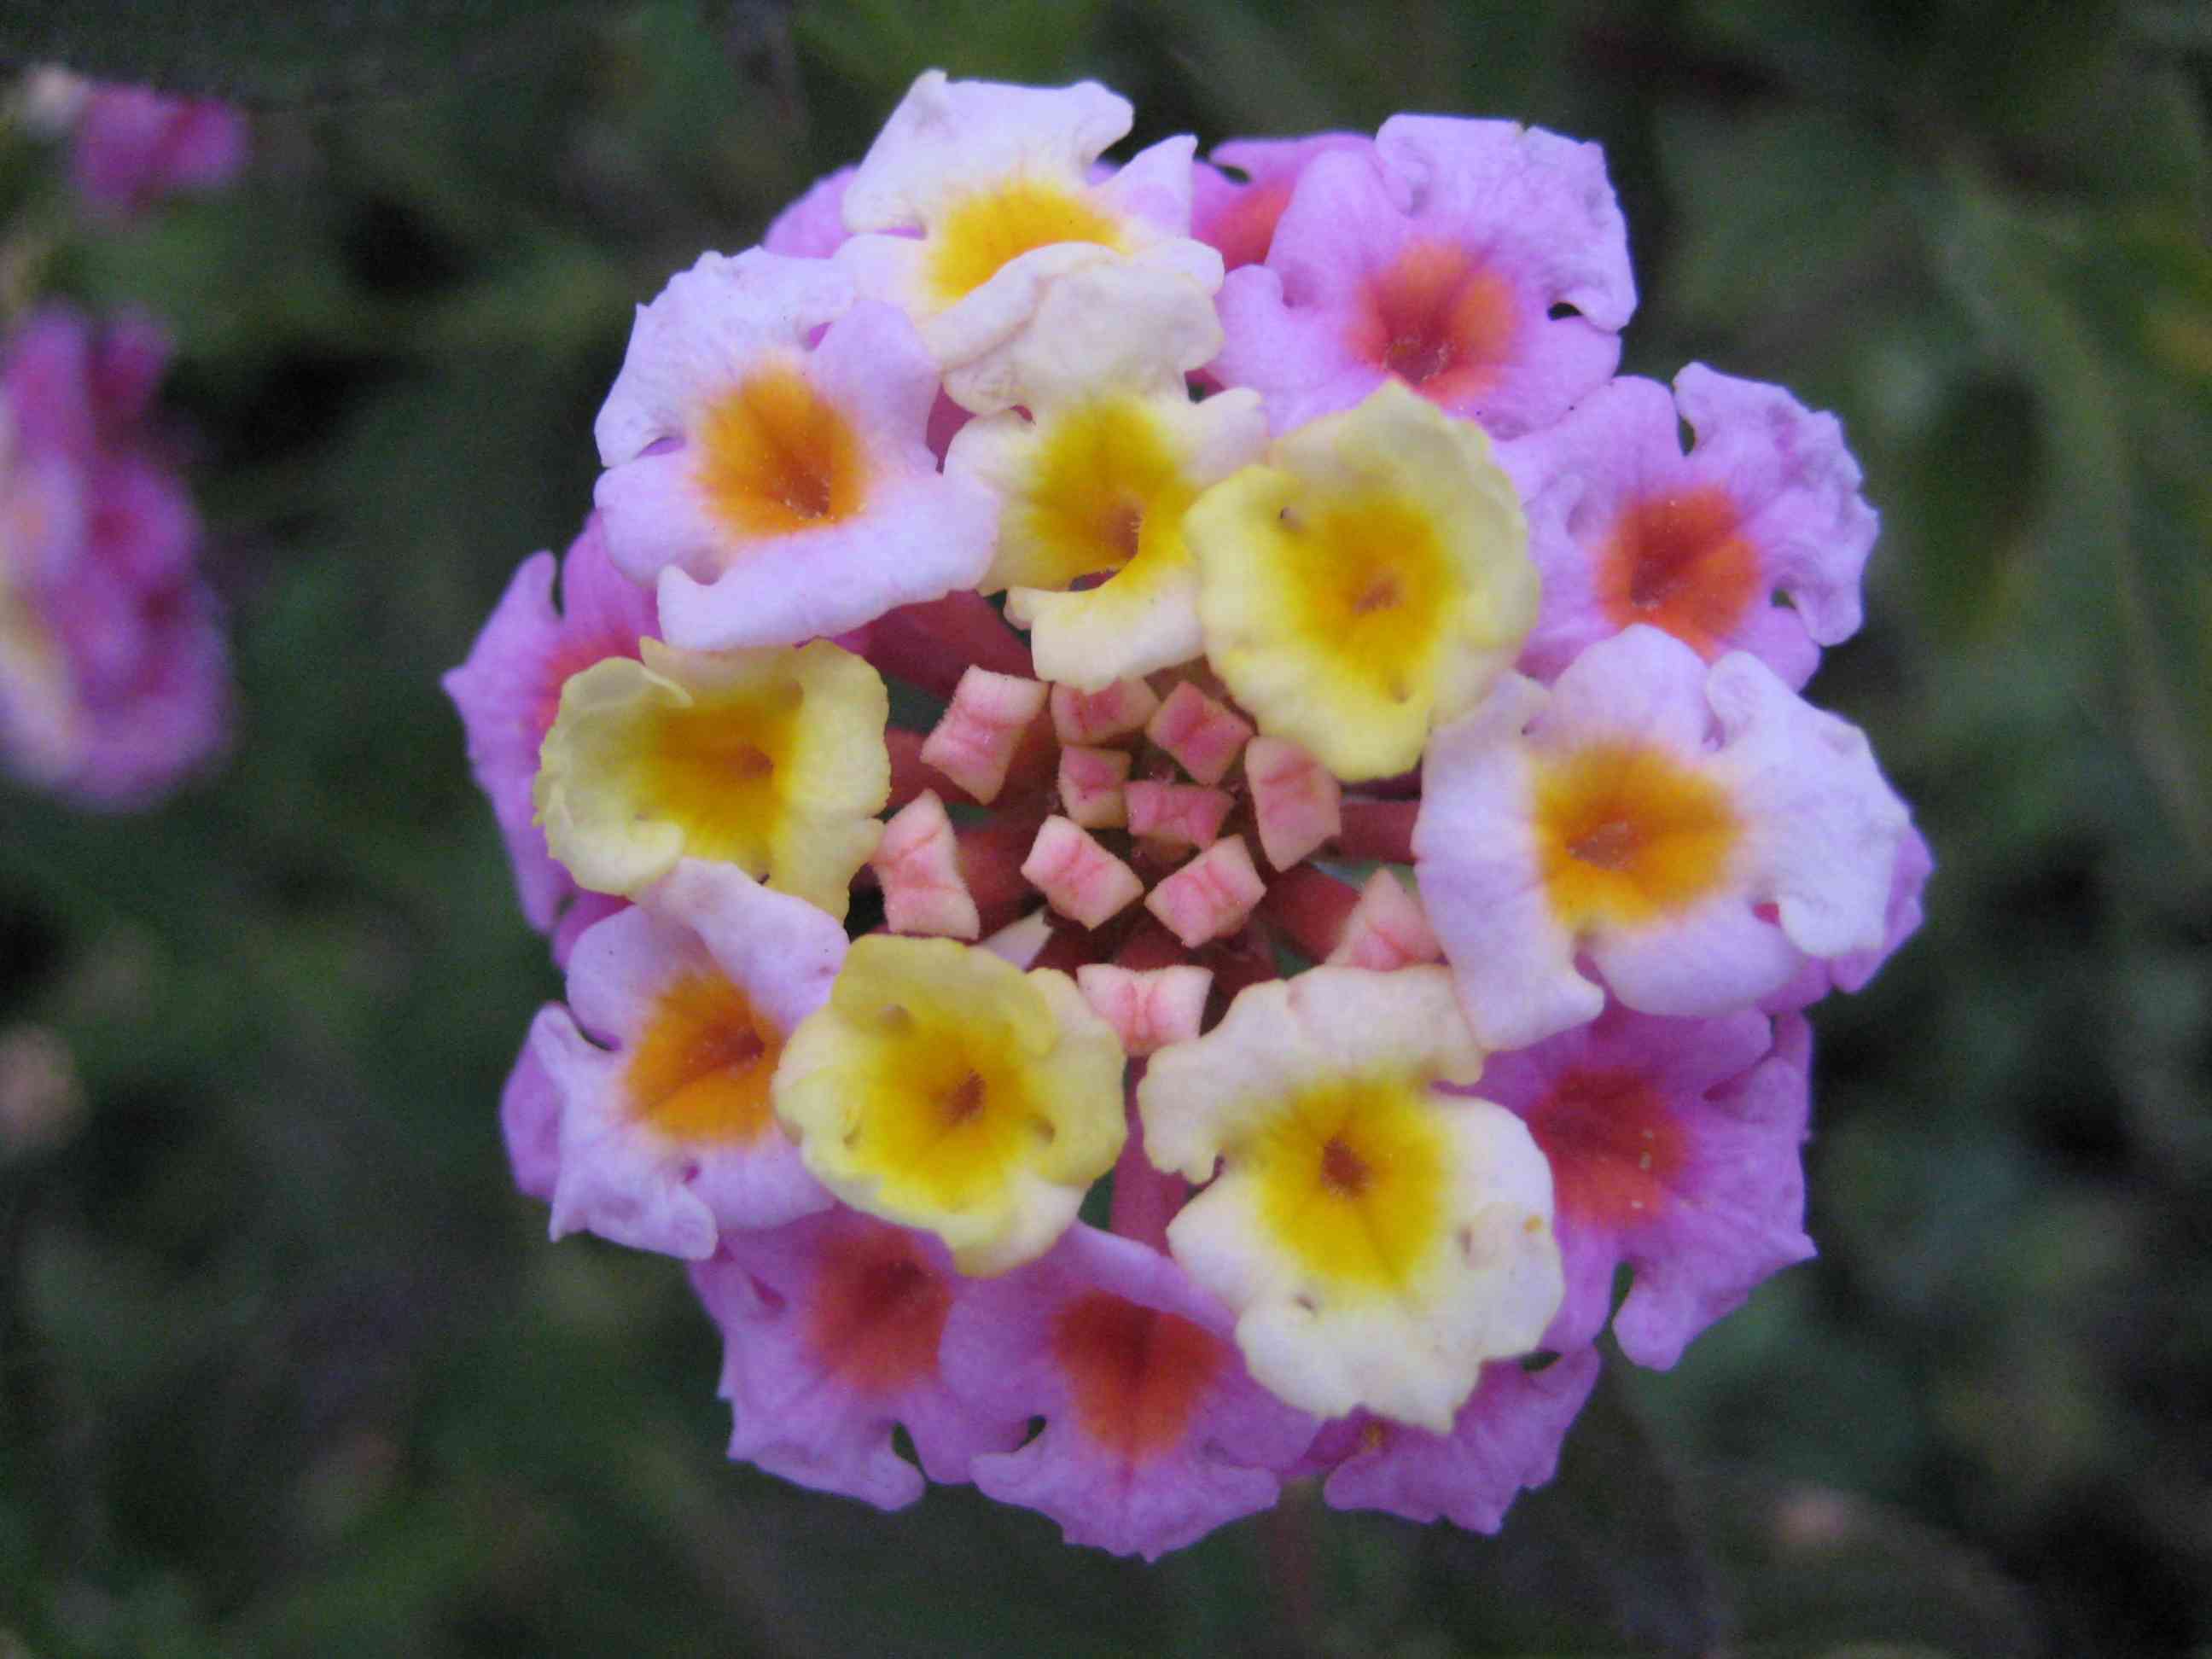
Resized to 200 pixels while maintaining aspect ratio:
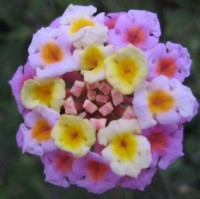
Resized to 200 x 150 pixels without maintaining aspect ratio:
Step 3 in this process has you choose a file type. If you’re not sure what to pick, either keep the default file format by selecting Same as original or choose JPEG (you can’t go wrong with JPEG for basic web and sharing uses).
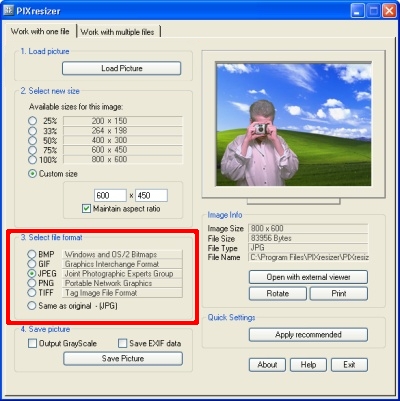
The last option, Step 4, allows you to save the image as black & white (Output greyscale) and keep the EXIF data (additional non-visual data). These should be unchecked if you’re just resizing the picture.
Click the Save Picture button and you’re complete!
Multiple photo resizing
One of the best things about PIXresizer is its ability to resize several different photos at once. This mitigates the chore of sharing, uploading, and storing photos.
First, switch the view by clicking on the Work with multiple files tab at the top of the window.

This view has a few different options but only two that we’ll cover. The first, aptly named Step 1, deals with where the files are and where they are going.
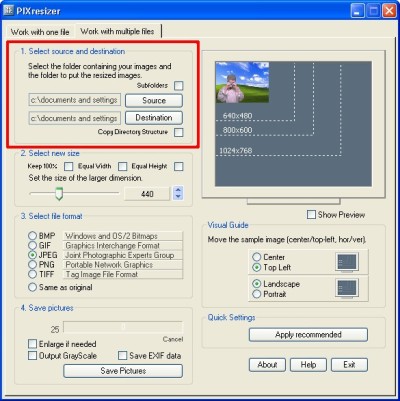
The organization here is a bit confusing at first but after this brilliant explanation, it will be clear.
The top button, Source, asks what folder on your computer holds the batch of pictures you wish to resize. Checking the Subfolders box above tells PIXresizer to include all the folders that are located within the folder you choose.
Click the Source button and find the appropriate folder. If that folder has all the pictures you want to resize and there are other folders present within that folder, keep the Subfolder box unchecked. If, however, you are resizing a whole directory structure of pictures, check this box and let PIXresizer loose.
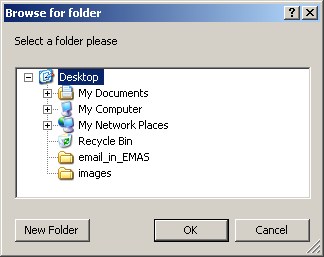
Now that you’ve told the program where to find the pictures, now you need to tell it where the new pictures should go. Click the Destination button and a window appears asking you where you would like to save the resized images. Pick a folder or click the New Folder button to, well, add a new folder.
If you are including subfolders from your source location and want to keep the same folders in the new location, click the Copy Directory Structure checkbox.
Now, pick the new size for all the pictures. Don’t worry about the checkboxes here; they’re not of too much use (in fact, I haven’t been able to figure out what their purpose is).
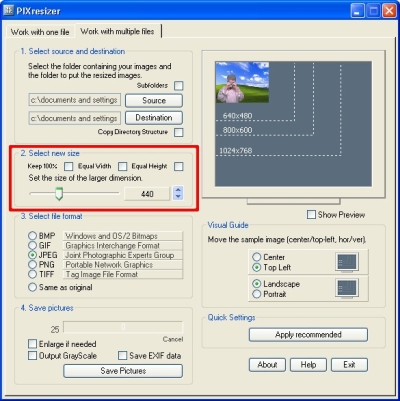
Simply adjust the slider to the size you want the largest dimension (so that portrait and landscape oriented photos adjust the same) from 96 pixels to 1200 pixels. The batch mode is not able to handle anything larger than 1200 pixels but, for most people, this is completely fine.
Lastly, choose the save pictures options (Enlarge if needed will enlarge any images in the directory structure that are smaller than your chosen size) and click Save Pictures.
That’s all you need to make your digital life (and those of others) just a little bit better! Please share this link with anyone you think could use it and, for those “net-challenged” folks, download the PDF, print it, and hand it to them.
< Take Action >
Comment via:
Subscribe via:
< Read More >
Tags
Newer
May 25, 2008
CDs burning improperly? Songs skipping? Verification errors? I can help!
Here are a few things I found out about burning a CD of any type. It turns out, the solution was easy.
Older
May 01, 2008
Self-Promotion, Me-Centricism, and Should Josh Help?
I have acquired a heavy pile of new books to certify myself in all things IT-related, an egotistical domain, and a sinking sensation that I might be going about this all the wrong way.