I was the maintainer of the Auth0 WordPress plugin for several years and, in that time, the idea of using Auth0 to protect the WP REST API came up several times. I finally got around to putting together a complete guide and, I'll be honest here, there is a lot more involved than I expected! Hopefully this is helpful for folks out there looking to build a similar system.
Overview
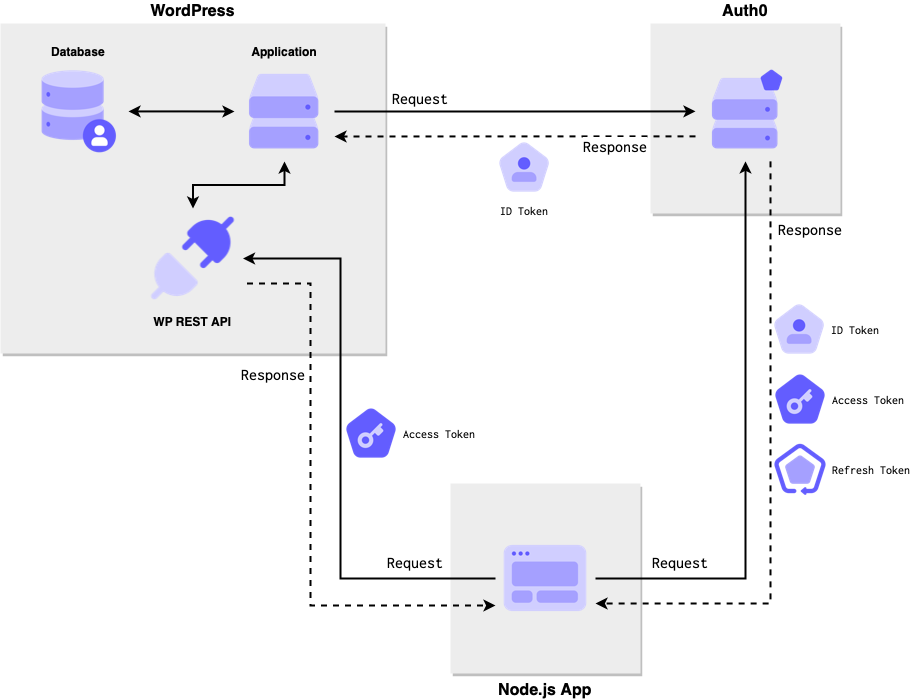
What we will be building is a network of 2 applications that share a single source of identity, Auth0.
One application will be a WordPress site that exposes a REST API (explained below). We will add Auth0 login capability to the main application and OAuth 2 protection for the API. The latter will allow API calls to be connected to the same user that created the WordPress account.
The other application will request an access token during login that will allow it to call the WordPress API on behalf of the user logging in. We will map our permissions to core WordPress capabilities to match, generally, the existing authorization scheme.
This system will allow the same user to log into both applications and create posts via API with the same identity.
Prerequisites
In order for this tutorial to work, you'll need to have the following.
- You should already have an Auth0 tenant (sign up for free here) and be familiar with how to create applications and connections. If you're starting from scratch, the WordPress plugin installation instructions below will get you up to speed.
- You should have a WordPress site(s) running and using the Login by Auth0 plugin. The installation instructions show how to add Auth0 login to a new or existing WordPress site.
- You should have at least one other application integrated with Auth0. This tutorial will provide a link to a locally-running application that you can use to test this system.
Alright, let's get started!
What is the WP REST API?
The WP REST API is a collection of endpoints built into WordPress core that can be used to do just about everything you can do with WordPress in a browser: read posts, manage posts, manage users, etc. If you go to the /wp-json/ route on any self-hosted WordPress site, you will get a big block of JSON back with meta information and and a list of all the endpoints available.
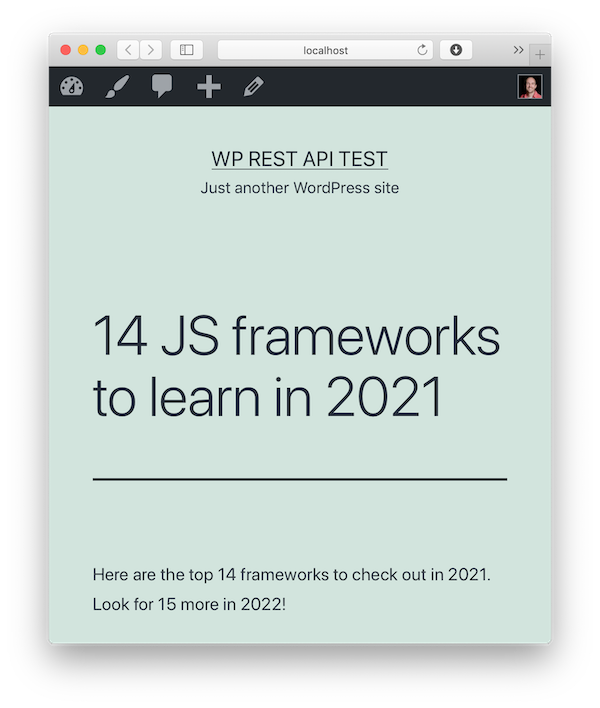
One of those endpoints, /wp-json/wp/v2/posts, will show the latest published posts on the blog as JSON (ref).
[
   {
      "id":1,
      "date":"2017-11-16T14:47:09",
      "slug":"hello-world",
      "status":"publish",
      "type":"post",
      "link":"https:\/\/example.org\/hello-world\/",
      "title":{
         "rendered":"Hello world!"
      }
      // ... truncated
   }
]
This endpoint can be accessed without any authentication, just like a typical list of blog posts does not require authentication. If you want to take an action that requires an account along certain privileges, like deleting a post, editing a user, or similar, then you would need to authenticate.
Authentication
The built-in authentication method for this API uses cookies. When you log into WordPress, a cookie called wordpress_logged_in_RANDOM is set. If you call the REST API from the front-end of the site, that cookie is included in the call and now you're able to take the same actions you would be able to using wp-admin.
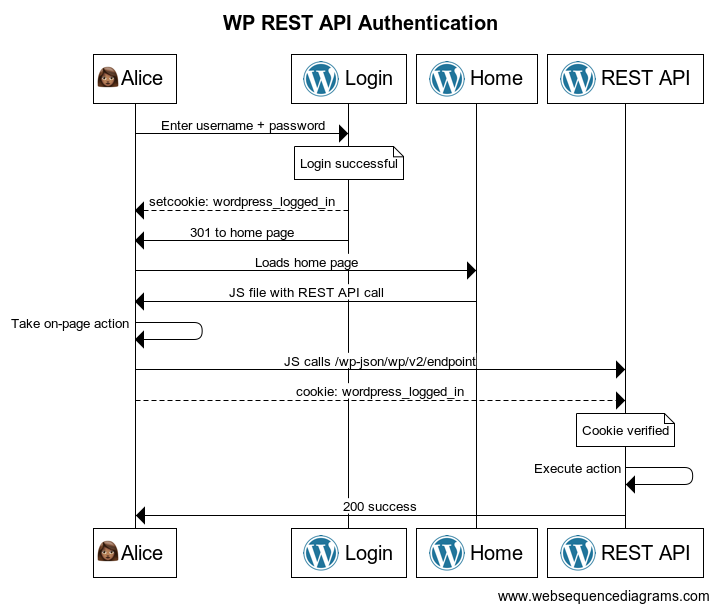
You can see this in action on any standard WordPress site by doing the following:
- Try a create post call against the posts endpoint directly:
❯ curl --request POST \
--url 'https://wp.example.com/wp-json/wp/v2/posts'

{"code":"rest_cannot_create",
"message":"Sorry, you are not allowed to create posts as this user.",
"data":{"status":401}}- Now, log into the WordPress site as someone who can create posts
- View your cookies in the developer panel and copy the cookie starting with
wordpress_logged_in_ - Generate a nonce using
wp_restas the action. I used the WP Console plugin to runecho wp_create_nonce("wp-rest");and put that value in the call below. - Add the cookie value and the nonce to the call below:
❯ curl --request POST \
--cookie 'wordpress_logged_in_XXX=[[COOKIE_VALUE]]' \
--header 'X-WP-Nonce: [[NONCE_VALUE]]' \
--url 'https://wp.example.com/wp-json/wp/v2/posts'

{"code":"empty_content",
"message":"Content, title, and excerpt are empty.",
"data":{"status":400}}
This works fine if the calls are being made from the same site. The cookie and the API have the same domain so your browser sends the cookie just like it would for a regular HTML page request. But if you want to call the API from a mobile app or a different application, cookies are not going to work because they cannot be sent across domains.
OAuth 2 to the rescue!

API authorization with Auth0
We're going to use Auth0 to protect our API in a way that will allow other applications to take actions that require privileges, like creating a post in our curl examples above. So a user will log into and application that is not the WordPress instance and be able to take actions on the WordPress site.
From the Auth0 docs:
Authorization refers to the process of verifying what a user has access to. In authorization, a user or application is granted access to an API after the API determines the extent of the permissions that it should assign. Usually, authorization occurs after identity is successfully validated through authentication so that the API has some idea of what sort of access it should grant.
So what does this mean for WordPress?
A user in WordPress is given a role which allows them to do certain things. If I'm an editor, for example, I can create my own posts and publish other people's posts but I can't remove a plugin. If I'm an administrator, then I can do all 3 and more. Roles represent a collection of capabilities or permissions that are given all at once when that role is assigned.
Authorization describes this same scenario but from a different perspective. If I'm logged into WordPress as a WordPress user taking actions on a WordPress application, then it all works like the above. But if I'm logged into, say, a mobile app as a user that has access to a WordPress site and want to take actions on that WordPress site, then things get a little more complicated. In that case, the mobile app has to request specific permissions for the WordPress site on behalf of that WordPress user. If those permissions are granted, the mobile app can now take the specific actions represented by those permissions.

If your head is exploding a bit, that's OK. This stuff has a steep learning curve and lots of jargon. That whole previous paragraph is a summary of the problem that OAuth 2 was created to solve: applications calling APIs on behalf of users. This is described in the system diagram in the Overview section above.
In order to get this whole OAuth 2 thing working on our WordPress site, we're going to do the following:
- Register the WordPress API in Auth0 and model the actions we want to allow via this API (once)
- Add a token validation method option to the authorization used in the WordPress site providing the API (once)
- Configure the external application to reference the WP API during login (once)
- Users log in using Auth0 to generate an access token (each login)
- Call the WP API with that access token (each WP action taken)
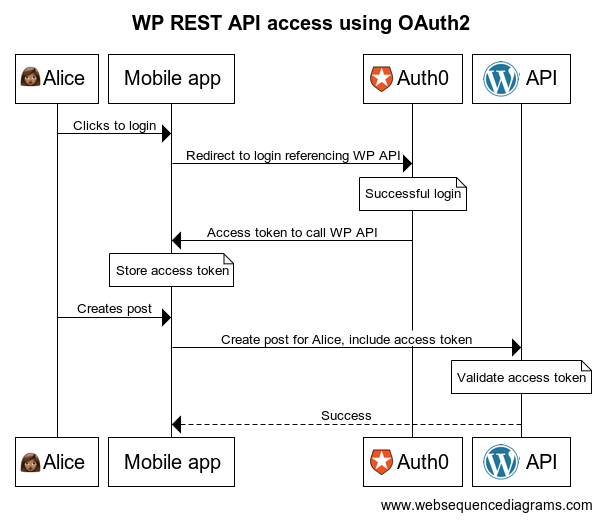
Once this is complete, the authorization will look something like this (simplified):
If you're more interested in how this whole OAuth 2 thing works, I would highly recommend one of Auth0's Learning Identity videos. Turn on closed captions so you don't miss any unfamiliar terms and don't be afraid to watch it more than once!
Let's take the first step in getting this working: adding the WP REST API to Auth0.
Register the WP REST API with Auth0
The first thing we need to do here is register our WordPress API in Auth0 so other applications can reference it during login and receive an access token to call it. I'm going to reference the Auth0 documentation here so I don't duplicate helpful words written by trained professionals. Start here and create an API using the following information:
- Name: Choose something descriptive
- Identifier: Use your WP API base URL like
https://example.com/wp-json/ - Signing Algorithm: Set this to "HS256"
Now click on the Permissions tab to add the WordPress capabilities we want to allow external applications to take. We don't need to add every single WordPress capability here, just the ones that will be requested by other applications. You can map these 1:1 with existing WordPress capabilities if you're using core WP REST endpoints or create additional ones if you're exposing your own API functionality (covered here).
In this example, we're going to allow creating posts under the current user's account and editing them, so we'll add:
publish_postswith a description of "Publish posts for the current user"edit_postswith a description of "Edit posts for the current user"
Later, when we log into our external application, we'll ask for one or both of these permissions as scopes to take action on behalf of a user (second step in the WP OAuth 2 sequence above).
If you want to learn more about how scopes and permissions interact, check out Vittorio Bertocci's post on OAuth 2 scopes on the Auth0 blog. There is a lot to unpack in this post, especially if you're learning this stuff for the first time, so I would recommend reading it more than once!
The rest of the API settings can be left as defaults for now.
Access token authorization in WordPress
Now, we need to enable the WP API to receive these access tokens, validate them, and make decisions for protected routes.
To do all of this, we're going to use the core WordPress filter determine_current_user to look for a token in the request headers of a WP REST API call and decide whether or not the call should be allowed based on the call being made and in the information contained in the signed access token.
The access token generated by Auth0 and sent by the external app will contain two values that will help us figure out whether this call should be accepted or not:
- The Auth0 user ID in the
subclaim - The permissions consented to in the
scopeclaim
Our job during authorization is now a bit more clear:
- Use the
subclaim value to find an existing WordPress user - Make sure the permissions required for the API call appear in the
scopeclaim - Make sure the user is capable of the permissions necessary in the API call
The first task is fairly straightforward and the last one is handled by core WordPress authentication. It's the second one that needs some attention.
The WP REST API expects a specific user record to be present in order to make permission decisions. But it also needs a user in focus for calls like post creation in order to set a post author. By default, you can only authenticate against this API (prove who you are), not authorize (prove what you're allowed to do).
In other words, the API expects a WordPress user in order to determine whether it will, for example, allow a "create a post" call. In this case, though, we only want to allow actions that are in the scope claim in our access token. The WordPress user in question is delegating specific actions they can take to the external application making the API call. Without checking the scopes, the external application could manage plugins, delete posts, and take actions that the WordPress user did not authorize.
So, we need a WordPress user in scope to associate the post to someone, but we need to adjust the capabilities down to what the access token indicates. We'll do that by hooking into determine_current_user when we have an access token on a WP REST API route.
To avoid a big block of unmaintained code here, I put the required logic for all of this in a repo on GitHub, which can be installed using the admin interface or Composer by following the steps in the README. Don't forget to add the required constants!
A few highlights of what the code is doing:
- We add a new filter to the
determine_current_userhook - We check if the request is for the WP API. If not, we return the
$userthat was passed in. - We check the request for an
Authorizationheader set toBearer SOME_STRING. If the header is not there or not formatted correctly, we return the same$user. - At this point, we consider the request OAuth 2 protected and will fail requests that do not conform.
- We attempt to verify the access token as a valid JWT formatted like an ID token.
- We attempt to find a user in WordPress with the same Auth0 user ID found in the
subclaim. - If everything up to this point is successful, we walk through the user's capabilities and remove all of the capabilities that do not appear in the
scopeclaim of the access token. - We set the
global $current_userto the modified user object and return the user ID.
With all of this in place, the rest of the WordPress request will keep the correct user in scope but only allow the capabilities that were found in the access token.
Check for WordPress registration (optional)
One thing to note about this segment: the Auth0 Action needs the migration endpoint on the WordPress site to be accessible on the public internet. If you want to test this system out locally, you'll need to either skip this section or make your local WordPress instance available using ngrok, localtunnel, or something similar.
What happens when a user logs into the external app and they don't have an account in the WordPress instance that serves the API? Without a WordPress account tied to the same Auth0 user, an access token will be valid but the WP API request will be rejected because the user cannot be found in the database.
We can let applications that are requesting access tokens know if the user needs to register on the WordPress site first before the API call can be made. We're going to use an Auth0 Action in the Login flow combined with endpoints provided by the Auth0 WordPress plugin to send back a true/false flag in the user identity.
First, we'll turn on the endpoints we need in WordPress.
- Go to Auth0 > Settings > Advanced tab in the WordPress admin.
- Turn on User Migration Endpoints and click Save Changes.
- You should see a migration token now showing. Leave this tab open so we can use it in the Action.
Next, we'll create the Action that will reach out and look for an account. Follow the Write Your First Action to create a new Action in the Login flow.
Add the following 4 secrets:
WP_API_IDENTIFIER- The API identifier we got when we created the WP REST API earlier.WP_API_BASE_URL- This is your WordPress site URL.WP_API_TOKEN- This is the migration token from the Auth0 plugin, generated earlier in this article.WP_API_CLIENT_ID- The Client ID for the WordPress application. This is the same value that is saved the Auth0 plugin settings.
Add a dependency for axios set to the latest version, then save the draft to make sure everything works.
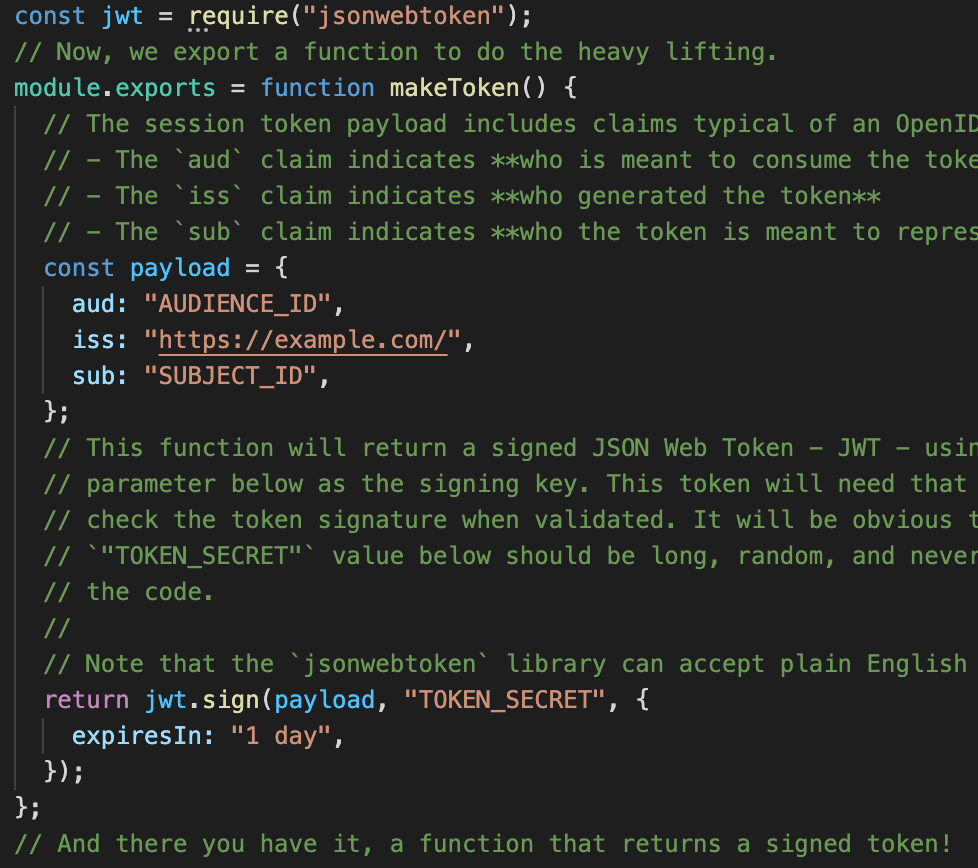
Now, add the following code to the editor:
You should now be able to select Deploy and add the Action to the Login flow according to the steps in the documentation linked above.
Walking through the code we just deployed:
- If the user does not have an email account then lookup is not possible and the Action is skipped.
- If the Action does not have the correct configuration the Action is skipped.
- If the login is for the WordPress application then account lookup is not necessary and the Action is skipped.
- If the application is not requesting an access token for the WordPress API then account lookup is not necessary the Action is skipped.
- If everything looks good, we call the "get user" endpoint of the WordPress site to see if we have a user with the current user's email
- If we got an error of some kind, including that the user does not exist, then we send a custom identity claim
https://wp/has_accountset tofalseso the receiving application knows that we might not be able to call the WP API as the current user - If everything worked out according to plan and we get a user back, we set
https://wp/has_accounttotrueand then the requesting application knows it can call the WP API with the access token it received
I added logging (use the Real-time Webtask Logs extension to see them during login) to help determine what's happening if there is a problem. Some or all of these can be removed once you confirm that the Action is working.
Build your application
We now (finally) have everything we need to call the WP REST API from another application and publish posts there! If you walk through the second sequence diagram above, you can see all the different pieces coming together.
If you already have an application and a WordPress site running, you have everything you need at this point. The summary of what we need to do in the application calling the WordPress API is:
- Build a login URL for Auth0 that includes the API identifier as an
audienceparameter and the permissions we are requesting in ascopeparameter. If you're using an SDK then this should be as simple as adding a couple of options. - Redirect to Auth0 to perform the login and API consent (more on that later)
- Receive an authorization code back and exchange that for an access token
- Use that access token to call the WP REST API
You can find help with these tasks on the following documentation pages:
- How to get an access token - general information on requesting access tokens and links to more information.
- Auth0 Quickstarts - many of these include a section on how to request access tokens during login. If not, check out the documentation for the SDK being used.
If you want to see this running as a discreet system, however, I have a simple Node app that can play the part of the external app calling the WordPress API. Clone this repo locally and follow all the installation instructions to get it working.
Once you have everything set up properly, go to the /wp-api route on the Node application and you should see a simple form.
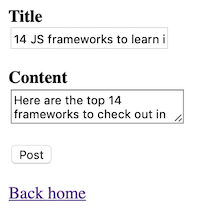
Fill out the fields and click Post. If everything goes as expected, you should see a confirmation page with a link to the created post on the WordPress site. Click that and you should see your post.
If anything goes wrong, check the console output for the Node app and you should have a clue. If you're getting a 404 error, you might not have pretty permalinks turned on for the WordPress site. If you're getting a 401, you might not have the MU plugin package installed properly.
< References >
- WP REST API repo
- WP REST API Composer package
- Auth0 WordPress plugin
- Official WP REST API docs
- Run WordPress locally using Docker
- Auth0 documentation on authorization
- Auth0 documentation on getting access tokens
< Take Action >
Comment via:
Subscribe via:
< Read More >
Tags
Newer

Feb 14, 2021
Curiosity, Freedom, and Truth: My Path to Mindfulness
Despite still riding out this pandemic with young children, the last 5 months have been a different internal experience than any other I can remember because of mindfulness.
Older
Nov 27, 2020
Testable Documentation Spike #1: "It's Just Code"
My first spike on finding a system to take linted, tested code and outputting usable markup. This spike uses Docco to turn transpile commented JS files to HTML.